How and When to Get Gauge
“My Hitchhiker is tiny! And my Shrug & More does not fit! Why is that?”
That’s easy, and you may have already guessed it: It’s because of GAUGE. The good news is: You do not always have to make a swatch, and there are patterns out there in which gauge is totally unimportant (e. g. Tensfield). But it’s good to know what it’s about, why it’s important and in which cases it does not matter.
Many experienced knitters and knitwear designers recommend that you make a gauge swatch before every knitting project you start. In every pattern you will find a number that tells you how many stitches are supposed to measure one inch (or four inches or 10 cm), for example “21 stitches on 4 inches in garter stitch”. That means that in your finished knitted item, if you put a ruler somewhere along one knitted row and measure that said distance, ideally you will count the number of stitches given. Why is that important? That number determines how dense your knitted piece is, and by that, its size. If I have knitted a shawl out of a light laceweight with 20 stitches per 10 cm, but you make 25 stitches per 10 cm, your finished item will be 20% smaller than mine. You will knit two and a half stitches per centimeter, but I will knit only two. If the shawl ends up with 300 stitches in total, mine will measure 150 cm (60 inches) and yours will measure 300:2.5=120 cm (48 inches). And then you might be disappointed because you had imagined your shawl to be much bigger.
For some shawls, the actual finished size might be irrelevant, or adjustable independent of your gauge. For example, you can knit my patterns Hitchhiker, Heaven & Space, Jasminde or Miss Winkle just until you have reached the desired size. Also, as you start with very few stitches on these shawls, you can just start out and regard the first few inches of your shawl as your gauge swatch. If you don’t like the fabric you are making or your gauge is way off – just rip back and start over with a different needle size. If you are making a pattern from a certain amount of yarn that is specified in the pattern and you expect your finished item to be of a similar size as the one you see on the pattern, you should try to knit it at the gauge specified in the pattern. If you don’t mind that your shawl might be bigger or smaller than the sample shown by the designer, you can just knit away and ignore gauge.
But if the pattern asks you to cast on a certain number of stitches (as in a cowl or a sleeve), it is very important that the number of stitches you knit results in the desired measurements. And that’s why in cases like these it is so important to always make a swatch before you start your actual project.
“Easy” is a pattern for which you do not need a gauge swatch
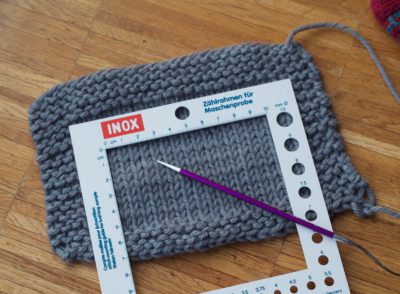
And this is how to knit a gauge swatch: Choose a yarn and a needle that you would like to use in the actual project. Write down which needle in which size you are using, because (if you are like me) you might not be able to remember once your swatch is finished and you have thrown your needle back into your bag. Also, it might be important to know whether the swatch was made on wooden or metal needles, because that may also lead to different results. Cast on twice the number of stitches that was given in the pattern for 10 cm or 4 inches. That is to give you enough room to properly measure and not have rolling ends to mess it up. Then, you knit a couple of rows in garter stitch to get a flat border. For a garter stitch swatch, just continue knitting until it is about 10 cm (4 inches) high and bind off loosely. For a stockinette stitch swatch, continue as follows:
Row 1: knit 3, purl to 3 before end, knit 3.
Row 2: knit.
Repeat Rows 1 and 2 until your piece is about 15 cm long (6 inches), knit another couple of rows in garter stitch and bind off loosely.
Now you can lay down your swatch on a flat surface, measure 10 cm or 4 inches across a row and count the stitches. I always use a knitting needle to keep track. The resulting number will give you a rough idea whether you are somewhere close to what the pattern demands, but you will only really be able to tell after you wash your swatch and let it dry thoroughly. So: Do to the swatch what you would do to the object you plan to make with this yarn, i. e. throw it in the washer and lay it flat to dry if it is a superwash for a sweater, carefully soak it by hand and pin it into shape if it is a laceweight for an intricate shawl. After everything is really dry (wet wool behaves very differently from dry wool), you measure and count again.
Now three cases can emerge:
A) Your stitch number matches the one given in the pattern. Congratulations, you can use the needle and yarn you did for the swatch and start your project.
B) You have more stitches on 4 inches than specified in the pattern (i. e. you have 22 stitches where the pattern demands 20). That means that your piece is too dense and an object knitted at this gauge would end up smaller than intended. If that is okay for you, you can start right away with the needle you used for swatching. If not, make a new swatch with a bigger needle size and see whether you have better luck next time.
C) You have fewer stitches on 4 inches than stated in the pattern (i. e. you have 18 where there should be 20). Your gauge is a tad too loose, which means your finished item would turn out bigger than planned. If you like your swatch and you do not mind the piece (shawl, scarf) to turn out big, you can start knitting with the needles you swatched with. But if you are planning on making a garment, you will need to make another swatch with smaller sized needles and see whether you achieve the required stitch number then.
I admit it all sounds like a lot of work, but if you think about how much time you will spend knitting on your project and having correct gauge will save you from disappointment, it is worth your time. Also, some knitters – once they try it – really fall in love with swatching, test-driving new yarns, trying out new patters…