Wann man eine Maschenprobe brauchtHow and When to Get Gauge
„Mein Hitchhiker ist so klein! Mein Shrug & More passt mir nicht! Was ist nur los?“
Ganz einfach: Die Maschenprobe haut nicht hin! Und gleich vorweg: Nein, du musst nicht immer eine stricken, bevor du dein eigentliches Projekt anschlägst. Es gibt sogar Anleitungen, bei denen die Maschenprobe piepegal ist (z. B. Tensfield). Aber es is nützlich, ein bisschen was darüber zu wissen, damit du entscheiden kannst, wann du tatsächlich eine brauchst.
In jeder Anleitung steht ein Hinweis zur Maschenprobe drin, bei meinen im Infokasten auf der Titel- oder Rückseite: „21 Maschen auf 10 cm in kraus-rechts“ ist da beispielsweise zu lesen. Das bedeutet, dass im fertigen kraus-rechts gestrickten Stück 21 Maschen eine Breite von 10 Zentimetern ergeben. Warum ist das wichtig? Weil diese Zahl festlegt, wie groß Dein Projekt wird, und auch, ob es sich eher fest oder eher fließend anfühlt. Wenn ich beispielsweise ein Tuch aus einem leichten Lacegarn mit 20 Maschen auf 10 Zentimetern stricke, und Du mit der gleichen Nadelstärke 25 Maschen auf 10 Zentimetern bekommst, dann bedeutet das, dass Dein Tuch um ein Fünftel kürzer bzw. kleiner wird als meins. Du brauchst für einen Zentimeter zweieinhalb Maschen, ich brauche 2 Maschen. Angenommen, mein Tuch ist am Ende 300 Maschen breit, dann wären das 150 Zentimeter. Bei Dir bedeuten 300 Maschen dann aber 300:2,5=120 Zentimeter. Und dann bist Du vielleicht enttäuscht, weil Du Dir das Tuch ja größer vorgestellt hast.
Bei manchen Tüchern ist es tatsächlich irrelevant, ob die Größe am Ende bestimmten Maßen entspricht – bei meinen Anleitungen wie Hitchhiker, Heaven & Space, Jasminde oder Brickless kannst Du ja einfach so lange stricken, bis Du es groß genug findest. Aber: möchtest du mit der von mir angegebenen Garnmenge auf eine ähnliche Größe kommen wie ich, muss die Maschenprobe stimmen. Hast du mehr Maschen je 10 cm als ich, wird dein Strickstück kleiner als das auf meinen Fotos. Hast du weniger Maschen, wird es größer.
Wenn ein Strickstück klein anfängt, mit nur wenigen Maschen und in jeder Reihe zugenommen wird (so wie beim Hitchhiker, Match & Move, Areas…), kannst du auf die Maschenprobe verzichten – du strickst einfach, bis das Stück in der Breite mehr als 10 cm misst, legst das Maßband oder das Lineal an und zählst nach. Passt die Maschenprobe nicht oder gefällt dir das Strickbild nicht so gut, ribbelst du ein paar Reihen und schlägst mit einer anderen Nadel neu an.
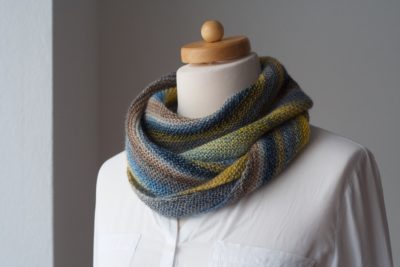
Wenn aber eine bestimmte Maschenanzahl zu Anfang angeschlagen wird, die dann die Größe festlegt (wie z. B. bei einem rundgestrickten Cowl oder einem Pulloverärmel), dann ist es sehr wichtig, dass Du mit der angegebenen Maschenzahl auch die gewünschte Breite oder Länge erreichst. Und darum solltest du in diesen Fällen immer eine Maschenprobe anfertigen.
„Easy“ – für diese Anleitung braucht man keine Maschenprobe
Eine Maschenprobe geht so: Entscheide Dich für eine Nadelstärke und ein Garn, das Du für das Projekt benutzen möchtest. Schreib dir auf, welche Nadel du in welcher Stärke verwendest, denn manche Strickerinnen arbeiten z. B. auf Holznadeln loser als auf Metallnadeln. Schlag doppelt so viele Maschen an, wie auf 10 cm kommen sollen. Würdest du bei einer angegebenen Maschenprobe von z. B. 15 Maschen auf 10 cm genau 15 Maschen anschlagen, würde Dein Ergebnis sehr ungenau, da die Maschen an den Rändern schlecht zählbar sind oder sich das ganze zu stark einrollt. Darum: Lieber ein paar mehr Maschen nehmen. Dann, damit du einen flach aufliegenden Rand bekommst, auch bei glatt-rechten Maschenproben erst einmal 6-10 Reihen kraus-rechts stricken. Für eine kraus-rechte Maschenprobe einfach weiter rechte Maschen stricken, bis das Stück ca. 10 cm hoch ist. Für eine glatt-rechte Maschenprobe so fortfahren:
Reihe 1: 3 Maschen rechts, bis 3 vor dem Ende links, 3 rechts.
Reihe 2: rechts stricken.
Reihen 1 und 2 wiederholen, bis das Stück etwa 15 cm hoch ist (oder so hoch wie breit). Dann nochmal 3-10 Reihen rechts stricken und lose abketten.
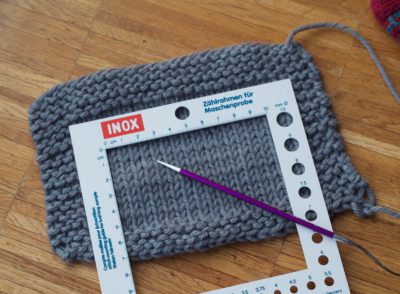
Nun kannst Du Deine Maschenprobe schon mal auf eine ebene, glatte Oberfläche legen (nicht Dein Knie!), mit dem Lineal (oder einem Zählrahmen wie auf dem Foto oben) 10 cm in der Mitte entlang einer Reihe abmessen und die Maschen zwischen der 0 und der 10 zählen. Ich nehme dafür immer eine Stricknadel zur Hilfe, mit der ich von Masche zu Masche gehe. Diese Zahl ist schon mal ein erster Anhaltspunkt, aber: Richtig aussagekräftig ist eine Maschenprobe erst, wenn man sie auch gewaschen und vollständig getrocknet hat – und zwar genau so, wie Du es später auch mit dem fertigen Strickstück machen würdest. Also: Wollwaschgang in der Waschmaschine bei Superwash-Garnen, anschließend flach hinlegen. Oder per Hand waschen. Lochmusterstücke sollte man anschließend auch spannen, also mit Stecknadeln auf einer weichen Oberfläche (Matratze) in Form pinnen. Nach dem Trocknen dann nochmal messen und Maschen zählen.
Jetzt können drei Fälle auftreten:
A) Die Anzahl Deiner Maschen auf 10 cm stimmt mit der in der Anleitung angegebenen Zahl überein. Dann herzlichen Glückwunsch – Du kannst mit der gleichen Nadel, die Du für die Probe benutzt hast, Dein Projekt beginnen.
B) Du hast mehr Maschen auf 10 Zentimetern als in der Anleitung angegeben (Du hast z. B. 22 Maschen, wenn 20 gefordert waren). Das heißt, dass Dein Gestrick zu dicht ist und Dein Stück zu klein würde. Wenn das für Dich okay ist, kannst Du mit der gleichen Nadelstärke Dein Projekt beginnen. Falls nicht, fertige mit einer Nadel in der nächstgrößeren Stärke eine neue Maschenprobe an und guck, ob Du damit mehr Glück hast.
C) Du hast weniger Maschen auf 10 Zentimetern als in der Anleitung angegeben (Du hast z. B. 18 Maschen, wo 20 gefordert wurden). Dein Gestrick ist also einen Tick zu locker und Dein Strickstück würde zu groß werden. Auch hier kannst Du trotzdem mit der gleichen Nadelstärke loslegen, wenn Dir das Gestrick so gefällt und es z. B. bei einem Tuch nichts ausmacht, wenn es etwas größer ausfällt. Bei Mützen, Pullovern und Kleidungsstücken, die körpernah passen müssen, strickst Du mit einer Nadel in der nächstkleineren Größe eine neue Maschenprobe und hoffst, dass die Maschenprobe dann passt.
Das klingt alles nach sehr viel Arbeit, aber wenn du bedenkst, dass du sonst vielleicht Zeit und Geld in ein Strickstück investierst, das nicht passt und von dem du enttäuscht bist, lohnt sich der Aufwand allemal. Manche Strickerinnen kommen beim Maschenproben-Stricken so richtig auf den Geschmack und haben Spaß daran, verschiedene Garne auszuprobieren und Nadelstärken auszuprobieren. Wer weiß, vielleicht auch du?
„My Hitchhiker is tiny! And my Shrug & More does not fit! Why is that?“
That’s easy, and you may have already guessed it: It’s because of GAUGE. The good news is: You do not always have to make a swatch, and there are patterns out there in which gauge is totally unimportant (e. g. Tensfield). But it’s good to know what it’s about, why it’s important and in which cases it does not matter.
Many experienced knitters and knitwear designers recommend that you make a gauge swatch before every knitting project you start. In every pattern you will find a number that tells you how many stitches are supposed to measure one inch (or four inches or 10 cm), for example „21 stitches on 4 inches in garter stitch“. That means that in your finished knitted item, if you put a ruler somewhere along one knitted row and measure that said distance, ideally you will count the number of stitches given. Why is that important? That number determines how dense your knitted piece is, and by that, its size. If I have knitted a shawl out of a light laceweight with 20 stitches per 10 cm, but you make 25 stitches per 10 cm, your finished item will be 20% smaller than mine. You will knit two and a half stitches per centimeter, but I will knit only two. If the shawl ends up with 300 stitches in total, mine will measure 150 cm (60 inches) and yours will measure 300:2.5=120 cm (48 inches). And then you might be disappointed because you had imagined your shawl to be much bigger.
For some shawls, the actual finished size might be irrelevant, or adjustable independent of your gauge. For example, you can knit my patterns Hitchhiker, Heaven & Space, Jasminde or Miss Winkle just until you have reached the desired size. Also, as you start with very few stitches on these shawls, you can just start out and regard the first few inches of your shawl as your gauge swatch. If you don’t like the fabric you are making or your gauge is way off – just rip back and start over with a different needle size. If you are making a pattern from a certain amount of yarn that is specified in the pattern and you expect your finished item to be of a similar size as the one you see on the pattern, you should try to knit it at the gauge specified in the pattern. If you don’t mind that your shawl might be bigger or smaller than the sample shown by the designer, you can just knit away and ignore gauge.
But if the pattern asks you to cast on a certain number of stitches (as in a cowl or a sleeve), it is very important that the number of stitches you knit results in the desired measurements. And that’s why in cases like these it is so important to always make a swatch before you start your actual project.
„Easy“ is a pattern for which you do not need a gauge swatch
And this is how to knit a gauge swatch: Choose a yarn and a needle that you would like to use in the actual project. Write down which needle in which size you are using, because (if you are like me) you might not be able to remember once your swatch is finished and you have thrown your needle back into your bag. Also, it might be important to know whether the swatch was made on wooden or metal needles, because that may also lead to different results. Cast on twice the number of stitches that was given in the pattern for 10 cm or 4 inches. That is to give you enough room to properly measure and not have rolling ends to mess it up. Then, you knit a couple of rows in garter stitch to get a flat border. For a garter stitch swatch, just continue knitting until it is about 10 cm (4 inches) high and bind off loosely. For a stockinette stitch swatch, continue as follows:
Row 1: knit 3, purl to 3 before end, knit 3.
Row 2: knit.
Repeat Rows 1 and 2 until your piece is about 15 cm long (6 inches), knit another couple of rows in garter stitch and bind off loosely.
Now you can lay down your swatch on a flat surface, measure 10 cm or 4 inches across a row and count the stitches. I always use a knitting needle to keep track. The resulting number will give you a rough idea whether you are somewhere close to what the pattern demands, but you will only really be able to tell after you wash your swatch and let it dry thoroughly. So: Do to the swatch what you would do to the object you plan to make with this yarn, i. e. throw it in the washer and lay it flat to dry if it is a superwash for a sweater, carefully soak it by hand and pin it into shape if it is a laceweight for an intricate shawl. After everything is really dry (wet wool behaves very differently from dry wool), you measure and count again.
Now three cases can emerge:
A) Your stitch number matches the one given in the pattern. Congratulations, you can use the needle and yarn you did for the swatch and start your project.
B) You have more stitches on 4 inches than specified in the pattern (i. e. you have 22 stitches where the pattern demands 20). That means that your piece is too dense and an object knitted at this gauge would end up smaller than intended. If that is okay for you, you can start right away with the needle you used for swatching. If not, make a new swatch with a bigger needle size and see whether you have better luck next time.
C) You have fewer stitches on 4 inches than stated in the pattern (i. e. you have 18 where there should be 20). Your gauge is a tad too loose, which means your finished item would turn out bigger than planned. If you like your swatch and you do not mind the piece (shawl, scarf) to turn out big, you can start knitting with the needles you swatched with. But if you are planning on making a garment, you will need to make another swatch with smaller sized needles and see whether you achieve the required stitch number then.
I admit it all sounds like a lot of work, but if you think about how much time you will spend knitting on your project and having correct gauge will save you from disappointment, it is worth your time. Also, some knitters – once they try it – really fall in love with swatching, test-driving new yarns, trying out new patters…